If you've never grown your own potatoes, now is the time to try! The versatile root vegetable is easy to grow in a small backyard garden, patio, or apartment balcony— even without a green thumb. With full sun and consistent watering, your potato plants can produce a bountiful harvest each season.
Potatoes are notorious for hogging space in small home gardens, but a potato planter provides a simple solution that saves space for other fruits and veggies. Amazingly, growing potatoes in an enclosed planter or bin can actually lead to a larger harvest! By forcing the plant to grow upwards instead of outwards, your plant produces more potatoes in less than half the space.
To help you create the perfect home for your potato plants, we've broken down a few easy DIY potato planters that allow you to grow potatoes or sweet potatoes.
7 Easy DIY Potato Planters for Every Gardener
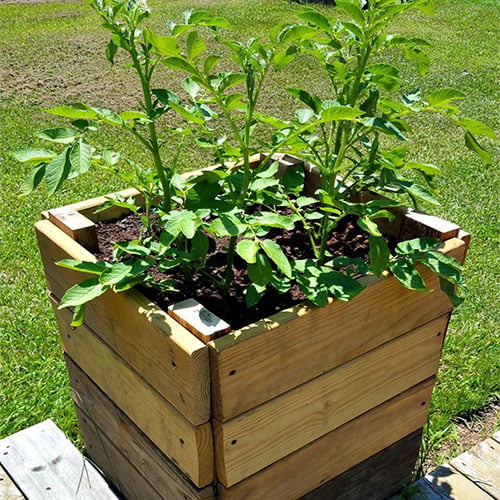
Wooden Slat Potato Planter
Potato planters don't need to be expensive or complicated to build. They are a great choice for planting potatoes. A simple potato box made from wooden slats or an old wooden palette will do just the trick! For a small potato crop, you'll need to build a planter with a 2' square box at least 3' deep.
Building a wooden slat potato box offers several advantages. The design allows for easy access to delicious potatoes, simplifying harvesting. It maximizes space by allowing vertical growth, which is ideal for compact gardens or patios. The wooden slats offer effective drainage and aeration, preventing soil saturation and fostering robust root development. Moreover, it's a customizable and aesthetically pleasing option for gardeners.
However, there are disadvantages to consider. Wooden planters may deteriorate over time due to exposure to the elements and require regular maintenance or sealing. Additionally, building one can be labor-intensive and may require woodworking skills. Proper soil and moisture management are crucial to prevent rot or disease.

Here's How To Build A Wooden Slat Potato Planter:
- Begin by cutting your boards to the correct length. To create a 2' x 2' x 3' planter, you must cut four 3' longboards and about twelve to sixteen 2' longboards.
- Next, pre-drill two holes on each end of the 2' boards, about ¾" away from the edge.
- Now, you're ready to build the outer frame of your planter. Screw the ends of four shorter boards together to form a frame. Repeat until you've used all of your 2' boards.
- Place one of the 3' long boards inside the corner of one of the frames and secure. Repeat on all four corners. This frame will be the base of your box, so choose one that looks extra sturdy. Once you've finished this step, your planter should look a bit like an upside-down table.
- One by one, stack the frames on top of the base, securing the corners until you've fully assembled your wooden slat potato planter.
- Once you are done, fill it with soil and then plant potatoes.
- When it's time to harvest your potatoes, simply remove one of the bottom slats with your drill for easy access to your crop.
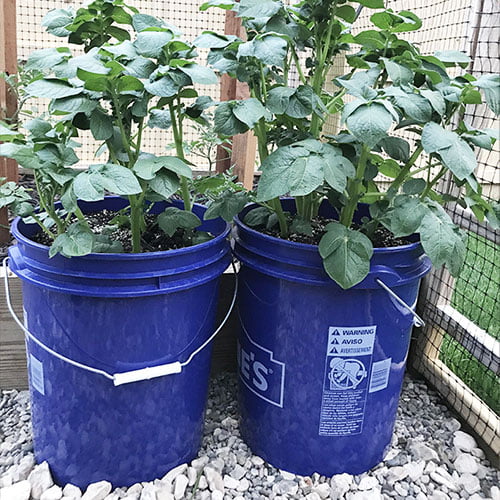
Growing Potatoes In A Bucket
Growing potatoes in a bucket is a popular alternative for limited garden space or to control soil quality. Building a potato planter from the large bucket is a great choice for those looking for a budget-friendly option.
The advantages of growing potatoes in a bucket include efficient space utilization, making it suitable for small gardens or patios. It allows for better soil control, reducing the risk of pests or disease. Harvesting is also more accessible as you can simply tip the bucket.
However, there are drawbacks, such as limited yield compared to traditional beds. Buckets may require frequent watering, and maintaining soil temperature can be challenging. Choosing the right bucket size and ensuring proper drainage are crucial. Overall, bucket potato gardening offers convenience but may require more careful management.

Here's How To Make A DIY Plastic Potato Bin:
- To avoid soggy soil and rotten potatoes, you'll need to drill drainage holes in the bottom of your bin. Using a drill or another sharp tool, poke around twenty small holes evenly throughout the base.
- Fill your bin about ⅔ full with a mixture of soil and compost. Plant your potatoes three to six inches apart at various depths in the containers. Water thoroughly, and voila!
Chicken Wire Potato Tower
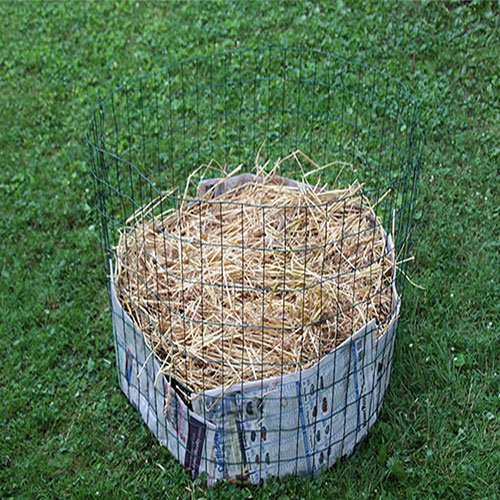
Try this chicken wire and newspaper planter tower to create a temporary potato planter in your garden. Using a piece of 6' to 8' long chicken wire, hardware cloth, or snow fencing, you can easily build a planter large enough to yield a plentiful harvest.
Growing potatoes in a chicken wire potato tower offers several advantages. The tower design maximizes space by allowing potatoes to grow vertically, making it suitable for smaller gardens. Furthermore, it enhances aeration and drainage, mitigating the potential for soil waterlogging and related problems such as root rot. Harvesting is convenient as you can dismantle the tower to access the potatoes. Additionally, it offers protection against pests like rodents.
However, there are disadvantages to consider. Building the tower can be labor-intensive, and sourcing the materials might be challenging. Soil maintenance and watering require vigilance to ensure even growth throughout the tower. Overall, the chicken wire potato towers are a space-saving solution requiring careful management.

Here's How To Build Your Own Chicken Wire Potato Tower:
- Using wire cutters, cut the fencing to your desired size.
- Bend the wire fencing into a circular shape, wrapping the loose ends around each other to close the loop.
- You can secure your fencing using a few garden stakes for increased stability.
- Layer five to six layers of newspaper or bales of straw around the inside of the wire. This newspaper or straw layer will securely hold the soil and potato plants in your wire planter. By the end of the season, your newspaper or straw will have degraded into the soil.
- Fill the top of the newspapers with a mixture of compost and potting soil. Plant your potatoes and water.
- You can add additional newspaper or straw layers throughout the growing season and repeat the process until the bin is full to increase your harvest.
DIY Potato Bags
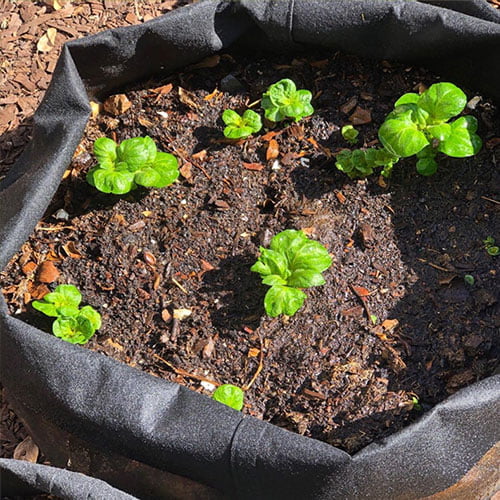
The most foolproof way of growing potatoes is using grow bags. You can use bags that you have from around the house, such as 30-gallon trash bags, grocery bags, fabric material bags, or compostable material bags. This technique is incredibly simple and offers an enjoyable opportunity to engage your children in gardening activities. This is a perfect method to try to grow your own potato with no gardening experience needed. You only need large bags, scissors, dirt, agricultural sulfur, and seed potatoes.
Cultivating potatoes in DIY potato bags is a favored choice among gardeners for a variety of reasons. Advantages include portability, allowing you to move the bags to optimize sunlight and space usage. Additionally, they offer outstanding aeration and drainage, reducing the likelihood of soil waterlogging and root rot. DIY potato bags are cost-effective and easy to set up, making them suitable for gardeners with limited space. Harvesting is a breeze as you can simply empty the bags to access the potatoes.
However, there are disadvantages to consider. These bags may require frequent watering, and managing soil temperature can be challenging. Proper anchoring to prevent tipping is essential. Despite these drawbacks, DIY potato bags offer a practical and efficient way to grow potatoes in constrained spaces.

Here's How To Create Your Own Potato Grow Bags:
- Use a scissor and a few drainage holes at the bottom of your bags.
- Fill up your bags with dirt and agricultural sulfur, but leave some room to place potato seeds.
- Place your seed potato and then add more soil on top. Then, place your bag in a warm area that receives full sun.
Laundry Basket
Growing potatoes using laundry baskets is an innovative and space-efficient gardening method that has gained popularity among both novice and experienced gardeners.
To grow potatoes in laundry baskets, start by selecting a sturdy, plastic laundry basket or container with good drainage. Fill the bottom with a layer of well-draining soil or compost. Place seed potatoes, eyes facing up, on top of this layer and cover them with a few inches of soil. As the potato plants grow, continue adding soil and compost, leaving a few inches of foliage exposed. Regularly water the basket to maintain a consistently moist soil.
Growing potatoes in laundry baskets is a practical and space-saving gardening method. One of the benefits is efficient space utilization, making it a perfect choice for small gardens and urban environments. The baskets offer excellent drainage, preventing waterlogged soil and associated issues like rot. Harvesting is straightforward—simply tip the basket to access the potatoes.
However, there are limitations to consider. Laundry baskets may produce a smaller yield than traditional beds, requiring consistent watering to maintain soil moisture. Additionally, you may need multiple baskets to meet your potato production needs. Despite these drawbacks, growing potatoes in laundry baskets is an innovative solution for home gardeners with limited space and a desire for homegrown spuds.
Here's How To Grow Potatoes in A Laundry Basket:
- Use a drill to create holes in the base of the laundry basket, enabling excess water to drain away.
- Place a few inches of well-draining potting mix or a blend of compost and garden soil at the bottom of the basket.
- Slice the seed potatoes into segments, ensuring each piece has at least one "eye" or sprout. Let these segments air-dry for a day to prevent rotting.
- Position the seed potato pieces evenly on the surface of the soil within the laundry basket, ensuring that the eyes are facing upward. If needed, you can lightly cover the potatoes with additional soil.
Use Pallets
Growing potatoes in pallets is a smart gardening solution that maximizes space. Begin by filling the gaps between slats in a sturdy wooden pallet with well-draining soil and compost. Plant seed potatoes, allowing sprouted eyes to face up. Add more soil and compost as the plants grow, ensuring the top leaves remain exposed.
Advantages include space efficiency, good drainage, easy access for planting and harvesting, and suitability for small spaces. However, this method may yield less than traditional beds, require regular watering and soil management, and involve disassembling pallets. Despite the drawbacks, pallet potato gardening offers a practical way to cultivate homegrown spuds, especially in urban or limited-space settings.
Here's How To Grow Potatoes in Pallets:
- Choose a sturdy, untreated wooden pallet with spaces between the slats.
- Stand the pallet upright and secure any loose boards. Optionally, you can choose to shield the back and sides with landscape fabric or a weed barrier to prevent soil spillage.
- Flatten the pallet and pack the gaps between the slats with a blend of well-draining potting soil and compost. Ensure the soil is evenly distributed.
- Place seed potatoes with sprouted eyes into the soil-filled spaces between the slats, pressing them firmly in place.
- Ensure the potatoes receive thorough watering, maintaining consistent soil moisture. As the potatoes grow, you can gradually add more soil and compost to bury the stems while keeping the top leaves exposed.
Burlap Bags
Growing potatoes in burlap bags is an efficient and space-saving gardening method, and it encourages the production of more potatoes without digging. To begin, acquire burlap bags or sacks that offer superb aeration and drainage properties.
Advantages of this method include efficient space utilization, easy access for planting and harvesting, and portability for optimal sunlight. It's especially suitable for small gardens or patios. However, potential drawbacks include the need for frequent watering, limited yields compared to traditional beds, and the bags may break down over time. Despite these considerations, burlap bag potato gardening offers a practical way to cultivate homegrown spuds, making it a popular choice for urban gardeners and those with restricted space.
Here's How To Grow Potatoes in Burlap Bags:
- Ensure your burlap bags are clean and in good condition.
- Flatten the burlap bag and partially fill it with a blend of well-draining potting mix or a mix of compost and garden soil, leaving a few inches of space at the top.
- Slice your seed potatoes into segments, ensuring each segment contains at least one sprouted eye or "chit." Allow these pieces to air dry for a day to prevent rot.
- Position the seed potato pieces within the burlap bag on the soil's surface, ensuring the sprouted eyes are facing upward. If necessary, you can lightly cover the potatoes with additional soil.
- As the potato plants grow and reach about 6 inches in height, add more soil or compost to the burlap bag to cover the stems, exposing the top leaves. This encourages more tuber development.
When To Plant Potatoes
Plant potatoes in spring, as soon as the soil can be worked and the ground temperature reaches about 45°F to 50°F (7°C to 10°C). Timing varies by region, but it's generally around 2-4 weeks before the last expected frost date. Potatoes prefer cool soil for successful growth.
When To Harvest Potatoes
Harvest potatoes when the plant's foliage begins to yellow and wither, typically 2-3 weeks after flowering. Carefully dig around the plant's base to uncover the tubers. Opt for harvesting on a dry day to avoid soil clumping. Allow freshly dug potatoes to air-dry briefly before storing.
Types Of Potatoes To Grow
There are numerous potato varieties to choose from, each with its unique flavor, texture, and best uses. Here are some popular types of potatoes to consider growing:
Russet Potatoes: Known for their high starch content, russets are ideal for baking, mashing, and frying. Their texture is soft, and their skin is robust.
Red Potatoes: These waxy potatoes have thin red skins and creamy flesh. They are excellent for boiling, roasting, or making potato salads.
Yukon Gold Potatoes: With their buttery, yellow flesh, Yukon Golds are versatile and great for mashing, baking, or frying.
Fingerling Potatoes: These small, narrow potatoes come in various colors (e.g., red, gold, and purple) and have a nutty flavor. They're perfect for roasting or boiling.
Purple Potatoes: These striking potatoes have purple or blue skin and flesh. They are abundant in antioxidants and can be incorporated into various recipes.
All-Blue Potatoes: As their name implies, these potatoes boast deep blue skin and interior flesh. They're suitable for roasting or making colorful mashed potatoes.
German Butterball Potatoes: With a creamy consistency and a luxurious buttery taste, these heirloom potatoes are ideal for mashing or baking.
Katahdin Potatoes: These round white potatoes are great all-purpose spuds and work well for mashing, roasting, or frying.
Adirondack Blue Potatoes: Like purple potatoes, Adirondack Blue potatoes have blue skin and flesh, making them a visually appealing addition to dishes.
